Tuesday, February 9, 2010

Keys what keys

One may ponder that when you buy a car, you expect to get a set of keys, but it's just not that way in this case. It was over a month before I even realized there wasn't keys in the car or in my possession.

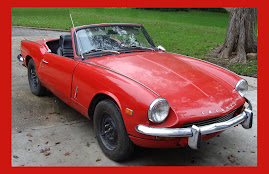
Strangely in this modern world, I have trust. On buying the car, I put trust in my brothers ability to find a good car at a good price, heck if it was good enough for him to buy it for himself, it's good enough for me. I have seen nothing on the car to change my mind. Excepting the non-running engine, and the rocker panel rust this is straightforward easy work. The two problem areas are a stretch for me but should be no problem with a little help from friends...

I didn't even realize the lack of key issue until I contemplated what's it going to take to get the engine running again... Gaskets, fuel system clean-out, battery, changing all the fluids, examining all the fluids, verify the removed electrical wires are taped up for no sparking, and then the turning of the key... Hmm... What key?

The shop where I'm working on it usually keeps all the keys of the cars locked tightly away for security's sake and he might have put it there, but I just didn't remember, quite embarrassing. I'm trying to be as least of a burden on him as he is enabling me to house the car there.

I e-mailed my brother about it.

"Keys, uh, you don't need keys for a Spitfire. Actually that was the one thing I never got from the PO. She was able to twist the ignition with any key she had in her pocket and she never locked the car, so she has no clue where the original is." --brother

Whew, that solves that mystery! I'm quite at ease with this outcome. Worst case I'll grind my own set but my brother has connections. It's a Cajun thing, it's good to know people.

"If you get me the tumblers, I can get my lock smith friend to cut a new set of keys and/or re-key the locks." --brother

What connections, I don't know anyone here with that talent, and I'm would only be a hack at cutting a key. I still haven't figured out the ward pattern for the locks as this is a restoration of a restoration, it could literally be any of the ward types.

I have removed the trunk hardware seen below: Mismatched hardware is one of my pet peeves, I'm likely to replace the hardware with Stainless Steel replacements. Paint over parts not meant to be painted, ugh no wonder it was flaking off in sheets.


After removing the pin, removing the cylinder, and a lot of polishing, WD-40, and goo gone, it cleaned up pretty well. The cylinder has a three digit number code on it. I'm unsure if that is the part number for the cylinder, or the key code. I'll have my brother ask his locksmith friend.


I thank my brother for such a wonderful project, and all the assistance till now and in the future.

Friday, February 5, 2010

Before and After

Cleaning is so much fun.

Front Side Reflectors

I am very happy with the results of this cleaning. The rubber came out fantastically. I used goo gone to clean up. Then after cleaning the goo stuff off, I applied Black Magic that restored the rubbers shine and flexibility. The chrome outside was polished, the base cleaned with goo gone, the thread was brushed and coated with WD-40. I'm still not happy with the plastic reflector but will look into ways to deal with that later. These are expensive to replace as I believe they were only used on the 69.


License Plate Light

This looked just pitiful and I was concerned that I would have to replace them. They look like they were a neglected part of the car's upkeep. Also notice the primer stuck to the base like it was placed on the car before the primer dried. Curious...


After cleaning the lens with CLR cleaner and a little bit of spit and shine it looks just wonderful.
The chrome is spectacular, no pits and looks just like new.


Headlight trim

The outer rings are the condition before, the inner rings are after, just a little digital photowork to keep things interesting. These cleaned up very very well, shining somewhat with their own glow. The rust was brushed off the metal tab and looks to be OK. Each of the two rings have mild dents in them, but they are not very easy to see, but running your hand over the shape will bring their location to light. I will try and press them back out but won't go far as it is very much not noticeable and I don't want to make the situation worse.


Wednesday, February 3, 2010

Seat Belts, Pontiac Fieros and Fiberglass Fabrication, Oh MY!

That's a little involved for a title but bear with me, it all makes since... Well it does to me... Well we'll just see about that!

Seat Belts

The seat belts on the car are definitely worse for the wear. The look to be a sorta blue green color, dusted with rust and generally an eyesore. The triumph metal sticker is missing on the driver side set and badly faded on the passenger side set. Ideally, these need replacement to be effective at stopping a body in motion.

I just love the old style attachments to the body in such that you can just remove them without any tools. Well, at least you should be able to. These took a little bit of pliers to get them worked off. I plan to clean them of the rust and refinish them by painting them black (maybe) to match the interior (I know what your saying, it screams for more wood, but it just isn't appropriate here.) My dad has some replacement belts and I'm considering having him stitch them up to the body attachment part. If it's good enough for the FAA it should be good enough for me!

Pontiac Fieros


My brother sold his Mustang back to my parents (eventually selling it to me, see previous post) to buy a Silver Pontiac Fiero?!? What was that boy thinking. Well to be frankly honest, the Mustang was nice but it lacked speed, nimbleness, and just needed a lot of TLC to keep her running. The Story goes, we were at his girlfriend's house, don't remember which one, and for some odd reason, we both put our seat belts on. We often went without them on the back roads, and never really though anything about it. We were driving, to make a long story short, over-correction and under-correction led us to sitting in a ditch. We were both hanging there by our seat belts, looking through the front glass at ditch dirt. We looked through the sunroof and still saw dirt. We made it through OK, though the Fiero's nose was tilted up slightly, looking rather snobbish. I don't remember if that's when he sold it or if he had it fixed, but from that day on, I have worn my seat-belt. It's amazing how little damage is visible on the plastic car.


This is the ditch we ended up in, nose in first, right between the two metal posts.


When it snows Down South, you just have to take pictures of your car. It's a natural law.


Fiberglass Fabrication

So how does this get into this post you may ask? Well if you look at the air scoops on the Fiero, those were fabricated out of fiberglass. They looked great and were very functional. It wasn't hard from what I can remember.


I have a long term plan to eather aquire a Hard Top for the Spitfire, or barring that, design and build a hardtop out of metal, glass and fiberglass. Definately in the concept stages, definately a large streach for my abilities, but I just think it'd be spectacular to have the option of running topless, ragtop, or hardtop. Hardtops for MK3 Roundtails are rare and are getting harder to find and if you find one, they are hideously expensive. The major fittings for them and the glass are available. It'll likely never come to realization, there is much to do on the car, but the seed was planted with my brother's Fiero and the air scoups. (Hmm, I wonder if I can sneek some woodwork into the Hardtop fabrication somehow...)

I also remember there being a series of pictures taken during the fabrication of the air scoops. I don't think I had print copies made from the negatives, copies of the prints themselves, nor have it in my early scanning attempts, and I don't think I had my first camera yet. If my brother or dad can dig them up, I'll issue an new post with them. If not, they will forever exist only in our memories.

Tuesday, February 2, 2010

Future Project #2

The sun visors on the car were removed and appear to be one of the few remaining interior pieces from the original car. The color code of the car says it should be a beige interior. I guess you can call this color vintage beige, it looks very worse for the ware. The mirror is a pit of doom to look into the dark recesses of your soul. Ok, so the mirror doesn't mirror, the beige looks almost grey, the catches for the mirrors are broken and almost unrecognizable.


This is a perfect case for replacement if the replacements wouldn't cost so much! $120 for a set could go very far in other parts, which I'm sure the Prior Restorer decided as well.

Plan for future project.

The one problem with the Spitfire line in general is with such a wonderful wooden dash, they just didn't use wood enough. Along with the Rear-view mirror, I believe a metal/wood hybrid replacement would look just spectacular. Based on the same design concept as the rear view mirror, the visors would be constructed similarly, with mirrors in both driver and passenger visors.
Driver side sun visor concept
Passenger side sun visor concept


Don't get me wrong, I love the fact that my dash is a full 3 piece dash, unlike the earlier dash in the middle, I just want to take it one step further.

There is no driving need to have this RIGHT NOW so I am filing this one as a future project.

Design Drawings were built as such:

Scan of each side of the original passenger side, then merged together. Digital manipulation was performed to remove the background, to draw the outline of the mirror and form fills to flood in the color and pattern. The image was then scaled down by half and the DPI halved to compensate. If this works, the image should be able to be used as a measurement reference source. If not, I will draw them in.

Monday, February 1, 2010

Bling Bling

It's all about the Bling!


I removed the rear badges from the Spit. The restoration person, it appears, did not place that much on originality and only a few of the Fix Attachments for the badges were in place. About 6 original were in place, very rusty and generally a PAIN to get off. The remaining posts were being held on by what appears to be Electrical Heat Shrink. This came off pretty handily with a pair of needle nose pliers.

I will add a picture of the rear without the badges at a later date as it was a very dim, grey and rainy afternoon when the removal took place.

On looking into the matter, the Attachents are only about $.35 cents each! Well thinking further, 14 @ $.25, 3 @ $.45 and 2 @ $.25 so a total of $5.35 to be able to attach the badges? That money can be better spent elsewhere, I plan to re-use heat shrink idea, which made them easier to come off.

All the chrome badges are pretty rough, the letter set TRIUMPH have deep scratches in the chrome though none of the scratches break through the chrome layer. The MK3 badge is in fine condition, with only minor pitting under the badge and no deep scratches. By far the worst is the Spitfire badge, with 3-4 pits through the chrome on the top, cracking of the chrome on the front, and lots of pitting on the underside of the badge. All are definitely usable though.

Those letters are a pain to photo off the car.

These are very easy to photo.

This final picture is from scans of the badges laying directly on a flatbed scanner, making for some very odd coloring of the chrome based on the angle. Rest assured all pieces are shiny and blinged out. With careful manipulation with Gimp, an open source image manipulation program, I was able to line up all the badges and make a pretty impressive transparent image.

One of the things missing on modern cars are this level of artistic use of chrome, leaving cars without style and attitude. I beg automakers to make more fun and artistic cars. Also, BMW owns the rights to the Triumph line and I would press on them that round-tails would make an excellent throwback car to place on the road today if safety concerns could be worked out. Hint Hint to BMW, a Spitfire would make for a excellent throwback car, lets all hope to be able to buy a 2011 Spitfire MK 5.

Future Project #1

Rear View Mirror...

Based on the catalog breakdown, my 1969 MKIII should be the same as those from 1962-70, on removal, it appears to be none of them.

The mirror base is definately looks to be from a later Spitfire, but the connection between the mirror and the base doen't match what's in the catalogs.

Maybe the catalogs are selling a non-original design, maybe my car has a mirror from some other car. Maybe it is original, and as it is common with this transitional year, replacement parts are just generalized that it will "work". Will investigate further.

The current mirror base was dirty, faded but in very good shape generally. A little bit of goo-gone cleaned up the "funk of ages" but it left the black base looked faded white. I put some Black Magic on it, looked good, one day later, it looked just as it did the day before. Another layer of Black Magic + one day left me with the same result.

Google is my friend, with a little research, Back to Black claimed to be better than Black Magic. Well, I added it to my shopping list. I went look for some of my cleaners and low and behold, I had a bottle. It's years old but it worked wonders, first application looked great, a day later it suffered somewhat like before but it was definately blacker, one more application left it an acceptable matte black.

The mirror base was lightly painted with a matte flat black. Handling it, the paint was flaking off, a quick pass of the wire brush removed all, I mean ALL the paint. Cleaned up the mold lines, primed and painted black.

The mirror itself was only mildly faded, and the Black Magic made quick work of it (Hey if it works, it works, if it don't it don't). The glass is stained on the mirroring and the plastic surround encasing the mirror is somewhat sun cracked.

Plan for future project.

I like the base and post, the mirror itself is somewhat iffy to me. I want to build a metal/wood hybrid replacement mirror. I will likely eather get a mirror cut, or get a good looking one out of a junk car and re-use the mirror (I think there is some sorta anti-fogging stuff on auto mirrors)

Original Concept Drawing

Parts on the Top to be re-used


Detail of the connection that would have to be imitated


More concept drawings and basic measurements


The mirror is quite serviceable and there is no driving need to have this RIGHT NOW so I am filing this one as a future project. I like the concept of the wood and Aluminum mixture and will likely make replacement sun-visors in the same basic manor. I will be making measurement drawings of those as well for Future Project #2.

Friday, January 22, 2010

Naked Spitfire

I have always found that the MK III Spitfires look naked without the bumpers attached. I removed the front and rear bumpers and they are in pretty good shape. There is a scratch in one of the rear bumpers, the front bumper is slightly bent, giving it a little but of attitude in it's smile.

Front View
With Bumper

Front View
Nekked

Rear View
With Bumper


Rear View
Nekked


After removal, the unprotected undersides show a lot of rust on unchromed supports, dirt, Wasp nest (no residents thankfully) and pine needles. The front bumper is missing two bolts that will have to be replaced.


During the photo-documentation, my puppy Snickers decided to do an apprasial of the condition himself. I guess it met with his approval as he quickly lost interest.


I will be cleaning these up at some later date and will document the results.

I also tried to remove the windscreen and again the seats, but was denyed It's best not to force these things and let them come as they do.