Friday, May 28, 2010

Driver Dash work


This is what the driver side dash board looked like when I got the car. The wood was questionable at best, all the instruments looked like they could use some work. The dash was removed and stripped of it's instruments and sent to my dad for repair.

My dad returned to me this very pretty looking dash, nothing like the falling apart thing I sent him. It's solid and even delivered with a protective paper layer.


The first part cleaned on the dash was this vinyl covered metal edge. The rust was brushed off, vinyl cleaned and conditioned. A light coating of WD-40 was left on the bare metal finish. It was in good condition to start with so the transformation wasn't too extreme. Now on to the Speedometer.


Looking at the speedometer, it doesn't seem too bad. The paint on the outside ring is obviously damaged and was slated for re-painting. The glass was hazy and the jewel for the ignition was floating around somewhere in the thing. I'm not too sure if it even works, as a speedometer from a later/earlier spitfire (chrome outer ring) was sitting in the trunk... Is it a sign from the spitfire gods that I will need it? Who knows...

The Speedometer outer ring was repainted, three times actually, as the paint kept cracking on multiple sprays. The ignition jewel was super-glued in. The glass was cleaned and Rain-Xed and looks simply great. I don't think the trip-odometer works at all. But it looks much better. Now on to the RPM gauge.

Not as bad off as the speedometer, but still needing the same level of TLC. I have many more pictures of the same process used on the speedometer, but slightly less cursing. Only Slightly.


This is the inner and outer ring just removed from the gauge. The rubber ring is worse than shot. I scraped the funk out of it and ended up with:

After much brushing with a wire brush, soaking in Evap-O-Rust, and repeating, I end up with:

Much better looking... I proceeded to primer both of the pieces. Originally the outer ring was raw metal on the underside. I primed it hoping to stay the effects of rust on it. On the RPM gauge, I also painted it black. I lived to regret this decision as the clearances forced me to have to scrape most of the black off on assembly.

As the inner ring was only black on one side, I left the opposite side in a primed state.


After the first coat was on the ring, it was a little light in places so I scuffed it up and spray-painted another coat. The paint crinkled up and looked like the above mess. I used a knife and cut off the top coat. It was scuffed and painted again. Again on the second coat it crinkled up. I cut off the top coat and sanded it back to metal. Very frustrating. Re-primed, repainted with two coats left an acceptable finish.

The RPM gauge glass was cleaned and Rain-Xed and looks simply great. The seals for the gauges were replaced and made re-assembly quite difficult. The replacement seals were smaller than the ring, so that they would grip between the ring and the glass. I took me hours to figure out that I wasn't going to just stuff it into the gap. I wild burst of inspiration led me to wrapping it about every half inch with sewing thread. It was strong enough to move the seal to the ring, but when the ring was pressed into it's place, it was cut through, releasing the seal. Each fragment of thread was pulled out and left the install looking quite nice.


All three of the discussed major pieces were mounted on the dash and the above is the results.


Bonnet Latches


The Bonnet Latches, emblazoned with an M for Italian designer Giovanni Michelotti, it really is a focus point on the car. A wonderful combination of function and style make these such a devil and delight for the car.

Original Condition
They were originally chrome and green. When the car was restored, they were over-painted black to match the inside of the bonnet, and red from the outside paint job. Obviously they didn't mask off properly. Both are showing wear issues, though one significantly more than the other. The latch portion is slipping to the side and on the worst one, it is off the roller and grinding a grove in the metal.
Cleaned
After removing the red spray and generally cleaning them up, they don't look half bad. Though at this stage I haven't addressed the wear issues.

Finished


After careful masking and respraying black, they don't look bad at all. I'm not all that happy with the paint job on them but it should never be seen all that much, and not up close at all. I cut about 1/4 of the radials out of washers and inserted them next to the latch. Pressed in place, it forces the latch mechanism not to slide to the side and stay on the rollers. Not too bad and very non-invasive. I will likely place a spot of JB weld to keep them in place or perhaps two part epoxy. I also need to get replacements for the mounting hardware as the original hardware is shot.

Compression test

The Dreaded Compression Test

I was really concerned that with the lack of the engine starting I was going to have a compression problem. I haven't done engine work yet and am not looking forward to it. I consider engine work to be like heart surgery, if you don't know how to do it, don't.


Well, leaving my fears of what I might find behind, I borrowed a compression test kit from my friend who owns the shop my car is at. I methodically tested each cylinder for compression, starting from the one farthest to the left. With the tester hooked up it looked like this:

The first two cylinders tested to about 110 PSI, which I am very pleased with. The third tested at about 50-60 PSI, disturbing me greatly, and the forth tested to about 110 PSI. I was worried about the third cylinder. It's kinda hard to get to and I wasn't sure if I had seated the tested firmly in place so I re-tested it. Low and behold it tested at the same 110 PSI as the rest of the cylinders as shown below on the simulated image.


Well, I'm totally stoked that the compression is good and even across all the cylinders, but that brings up a sour fact. The engine is still not running. I smelled gasoline on the spark part of the spark plugs so fuel was making it to the cylinder. Further investigation showed that I'm not getting spark to the Spark plugs. Another point to investigate in my quest to get the engine running.

Wiper Motor

The wiper motor really has taken a beating over time. I've never powered it up and I'm assuming that all is well with it and make it look clean.


The motor itself looked simply ratty. Painted black on one side, rust and the remains of silver on the bottom. I opted to respray the piece silver, the same silver I used for the headlight adjusters, and spray the electronic connector area black.


Once removed, the wiper seemed to be removed when the area was painted, and then as an afterthought, painted black with it still mounted on the car. You never know what people were thinking...


Inside the beast looked pretty good considering. a cleaning and chipping off the bad paint job and rust left it pretty in its nude shape. All components were cleaned, degreased, and masked for painting. I didn't paint any of the inside mechanical areas for two reasons. I didn't want paint to foul the mechanical sections and to be frankly honest, the inside was in good condition and would never be seen.


The finished product looks good, much better than the original. I'm not very pleased with the silver when I sprayed a clear coat over it. It really dulled it making it look gray instead of silver.
The mechanicals were re-greased, shafts polished, and it generally seems like it will work just fine.

Monday, May 17, 2010

Front Turn Light Madness

Passenger Side - Original Condition and removal

The front turn lights were in pretty rough shape to begin with and were definitely botched by a PO. I won't bemoan this as one must do what you can when it comes to up-keeping cars like this. First, of 4 bolts that are supposed to hold the light down, only two were present, so basically there was nothing holding the base to the car except the lens cover. Of the two bolts holding it together, they were not the correct size for the application. The lens cover should bolt to the threaded base, where here it went through and through to the bonnet and attached with a nut there with overly long bolt. This made removal difficult, as the bolt had seriously rusted. I almost stripped the head off the bolt and the bolt was extremely hot after removal due to the friction of the built up rust and funk. The seals are in pretty bad shape, but are intact. Over-Spray from the red paint wasn't too bad but was still present.

Driver Side - Original Condition and Removal

The driver side was installed in a similar fashion with the exception of the attachment and seals. Instead of nuts holding it together, it was sorta a flat piece of metal, with cutouts to grasp the bolts. Again the bolts were miss-sized. The seals on this side were shot, mostly missing. The base suffered from the lack of seals and was almost completely covered in rust. Over-spray from the red paint-job made this base a real mess.

Passenger Side - Lens Removal

The passenger side lens is in pretty rough shape, needing TLC and repair. One side of the lens has broken off, luckily under the retaining plate. It is dirty and have calcium buildup from years of water drying off on it. The entire lens surface is dull, and pitted from impact of small rocks.

Driver Side - Lens Removal

The driver side lens is in horrible shape, needing TLC and repair. One side of the lens has broken off, luckily under the retaining plate and the other had a chunk missing that is viewable from outside the plate. It is filthy dirty, probably from the failed seal, and have calcium buildup from years of water drying off on it. The entire lens surface is dull, and pitted from impact of small rocks.

Passenger Side - Sample of the Lens after Cleaning

Though I don't have a ready picture of the driver side, I do have the passenger after cleaning. The grime cleaned off well, but the hard water stains still remain. Also, it's very apparent that the cloudiness of the lens itself is in the plastic top layer.

Passenger Side - Spray

The lens base was cleaned, brushed to remove rust and over-spray paint, and masked off for respray. Painted Silver left it looking very good. I'll admit I'm not the best painter in the world but I am happy with the results.

Driver Side - Introducing Evap-O-Rust

With the failed seals, the driver side base was really bad off. My usual brushing didn't even phase the rust accumulation and I was forced to bring in extra ammunition. Evap-O-Rust, found at Harbor Freight, provided me the method to soak the rust away. You can see the line where I flipped it and soaked the other side. It works wonders and really made the difference on this piece. It is causing me to rethink so of the other "finished" pieces...

Passenger Side - Spray Result
Overall I am happy with the result. A little bit shinier than the original would have been, but much better than what it was. The wires were cleaned with soap and water.

Driver Side - Spray Result
Again, I am very pleased with the transformation of this piece. The original looked like it should be trashed and I was dreading replacement costs and the search for the parts. It looks like it's better than the original.

Passenger Side - Epoxy Repairs
I switched the two best pieces and matched them together for the passenger side. The hole that was in one side was filled, after making a form with masking tape, with two part clear epoxy resin. I wanted to color it but didn't want to go to that extreme, if it didn't look right I would just go to the trouble to replace. The filler worked just fine, filling the missing piece and solidifying the remaining fractures without being obviously a repair.

Driver Side - Epoxy Repairs
The two worse pieces were used for this one. The same method was used on this one as well, with the exception of needing to drill out the holes. The color difference is hidden behind the chrome retaining ring.

Passenger Side - Final Product


Driver Side - Final Product
Mated with new hardware, which so happens to be the same as rack screws. I have literally hundreds of rack screws that have followed me home from work as spares in my pockets, I was quickly able to make up two sets in steel. The lens were scuffed up with a 3M pad until only the worst of the rock chips were visible in the newly hazed surface and sprayed with a clear coat of paint. The overall effect is pretty spectacular. The deeper chips are still visible, but overall I'm very pleased with the results! These completed units are safely padded and stored for eventual re-install on the car!

Friday, May 14, 2010

Bonnet Prop


Having removed the bonnet prop way back in February, (Where does the time go?) I've been using a fiberglass shaft, as a prop rod. It works, but I am always worried that the bonnet will come crashing down on me, or worse, flip completely over and damage the car/bonnet.
I sent the prop off with my dad for stripping, and he returned it, sans hardware, in a perfect acid-etched primer condition. I was going to replace the hardware anyway so it wasn't that big a deal and the rod looked very, very nice.


Something didn't seem quite right with it. There were simply too many spacers in the middle and once I eventually got hardware I wanted to use on the car, it never seemed to fit right at all. Several attempts were made to install it, I was never satisfied with the results so I would pull it off. I eventually thought about it long enough and it dawned on me that one of the pieces was flipped. I referred to one of the literally hundreds of digital pictures to reference how it was assembled prior to removal (Take plenty of Digital Pictures, even if you aren't shooting something specific. You never know what you'll need to reference). Removing the extra spacers and flipping the piece removed all install issues.


When I get there, the rod will be painted black as I plan to have all interior painted black, except for under the dash panels. I want to leave the original Laurel Green under the dash for future owners to discover if they ever venture that far in parts removal. Installed, the rod is definately functional and should last another 40 years.


Friday, May 7, 2010

The Stud

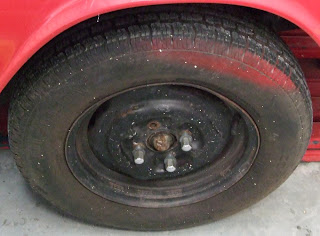
The Front Passenger side wheel was missing a stud and I feared the worst... On removal of the tire for cleaning, I was much revealed to see that it wasn't broken, and the rear wasn't stripped or damaged in any way, other than the usual layer of rust.

I had ordered a replacement from Victoria British and wasn't all that happy with the quality, but I am by far no expert. The part looked like it was stripped off a car, with the usual brown patina found on a part that 40+ years old. In retrospect, it may be that it has been coated to protect this critical bit of metal.


I had done my research on the internet and thanks to (http://www.totallytriumph.net/spitfire/hard_lesson.shtml) I had prepared myself with spacers, and was ready for install. I had also cleaned the tires, one by one. So the tires were rotated around the car.


I coated the Stud with WD-40 and flooded the whole with WD-40 as well. I jabbed the Stud into the whole firmly. I added the spacers onto the Stud and proceeded to starting the lug. I torqued down on the lug and turned and turned and turned. I checked the stud but it wasn't moving. I removed the lug and realized it was deforming the spacers... They were aluminum... I removed them and punted. Getting the lug off the Stud took quite a bit of patience as it had backed out and was free spinning.

I re-seated the stud and placed the tire on. I put the 3 good lug/stud combos on and slowly torqued down on the lug. I wasn't able to feel the stud moving so I would have to take the tire off, check the depth, the repeat. After removing the wheel three times, I was satisfied that the stud was firmly in place and looked like it had been in the car day one.