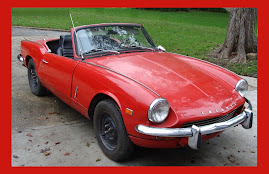
A combination of work, personal life, and size of the next task has led to a long period of progress stagnation, the doldrums. I've been working heavily with the British Motoring Club of New Orleans, we had another successful car show. I've been re-vamping the club website, and is currently acting Newsletter Editor.
The Company I work for is selling a division, leading to job jitters. And to add to it, I need to strip the car and prep for paint, something I've never done and need to learn. Fear not, I still think of the car often and have been planning and working and assembling stuff for the next stages.
I'm in the process of cleaning out the shed, my primary workspace. It had gotten so cluttered, I didn't have any more room to work. I've cleaned it out, and I am prepping to re-organize the parts and begin anew.
Once I get it back in gear, I will be updating this blog with progress.
Tuesday, June 7, 2011
Monday, January 17, 2011
Welding 302
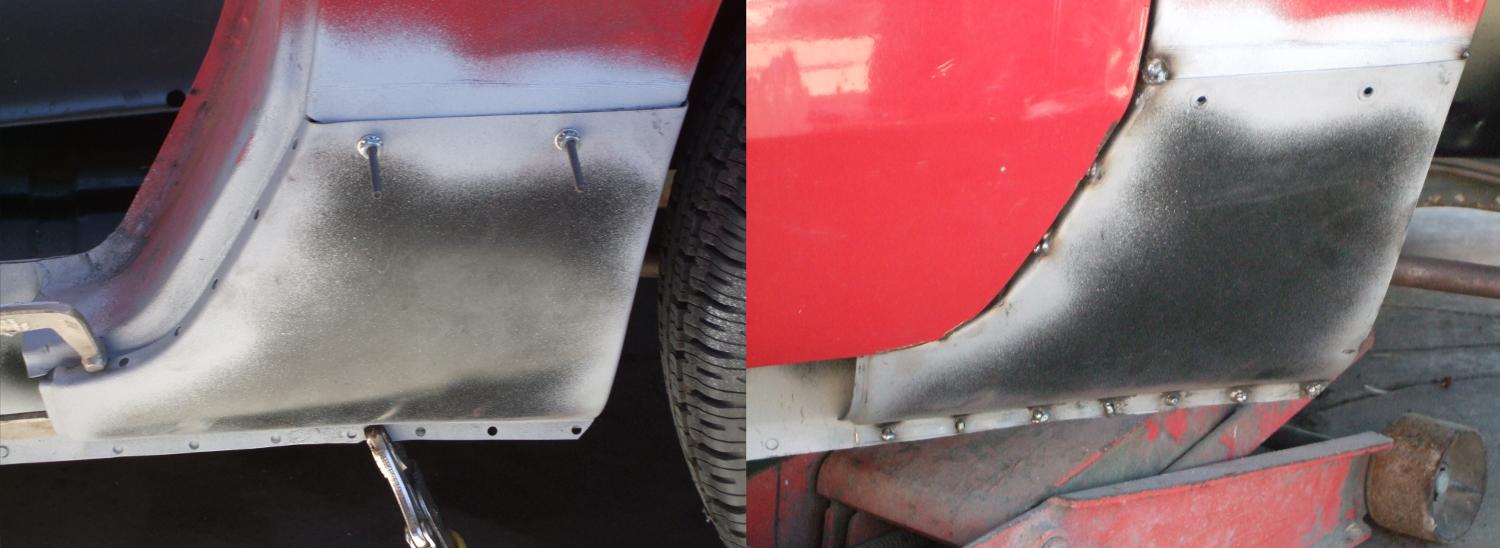
Ahh, all my minor successes has led me to one big test. The passenger side rocker panel. Prepped in the same way as before (This update brought to you by the Redundant Redundancy Department).
 When I proceeded to stripping it, everything was going well... too well... The wheel grabbed at the metal and ran off the other side and bushed right on my left hand! It looked like 1000 little scratch marks, each about 1 inch long. The cuts were not very deep and the damage was more embarrassing then dangerous. A simple pair of gloves, more attention to hand placement, had my father taught me nothing? Well, it served as a reminder that you always have to be vigilant and the most mundane tasks can cause serious injury. Consider me reminded.
And thus it begins. In test fitting the rocker, something definitely wasn't right. It looks like the replacement panel is a bit too tall on the top and a bit to short on the bottom, like it slipped while stamping it. Drat! And this is the piece I've banged around a bit. I can force the top to scrunch down but it pushes the bottom to the point I can't weld it with the short line. Measuring from pre-stamped holes it's definitely a bit off. Looking at it, if I could weld the top of it pushed down, I can force the bottom up to meet the weld line, but wow, how to juggle all that while trying to weld, trying not to burn through the car and burn through me as well.
 I remembered in one of the tool boxes at the shop I found a pair of pliers that simply refused to open more than a few sheets of metal wide. Just perfect for my plan! I would use the pliers and the weight of the car to press it down for welding. It was a bit short but it worked spectacularly. Put the pliers in place at an angle, wedge my leg and thigh under the car and lift until I could get the pliers straight up. Weld two holes, lift again with thighs and reposition prop. It was just enough to press it tightly to the weld line, but not enough to damage the metal. Once prop-ed, I could wiggle the metal to make a good fit and weld away. It made for really long slow progress, but it was progress!

Once I got to the front bit under the bonnet, I realized how hard it was to bend back the metal I had mangled so much ripping off the old metal. Process was beat back old metal from the inside, with body-working hammer and bar, until the inside metal was flush with the new metal. Weld one hole. Repeat, again and again and again. Learned my lesson. Yes metal can be repaired, it just takes alot of time and effort. Much better not to mess up the metal in the first place.
 Overall, I an happy with the results, even if this side was a bit more problematic from the start. The lines all meet up well and prepwork needs to be done for painting now.

Line-weld points are taped over for later welding. Both sides replaced, though critical time was wasted waiting for someone to do it. Need to get the line welds done now...
Punched, but not stripped or primed.
 When I proceeded to stripping it, everything was going well... too well... The wheel grabbed at the metal and ran off the other side and bushed right on my left hand! It looked like 1000 little scratch marks, each about 1 inch long. The cuts were not very deep and the damage was more embarrassing then dangerous. A simple pair of gloves, more attention to hand placement, had my father taught me nothing? Well, it served as a reminder that you always have to be vigilant and the most mundane tasks can cause serious injury. Consider me reminded.
And thus it begins. In test fitting the rocker, something definitely wasn't right. It looks like the replacement panel is a bit too tall on the top and a bit to short on the bottom, like it slipped while stamping it. Drat! And this is the piece I've banged around a bit. I can force the top to scrunch down but it pushes the bottom to the point I can't weld it with the short line. Measuring from pre-stamped holes it's definitely a bit off. Looking at it, if I could weld the top of it pushed down, I can force the bottom up to meet the weld line, but wow, how to juggle all that while trying to weld, trying not to burn through the car and burn through me as well.
The Rig
 I remembered in one of the tool boxes at the shop I found a pair of pliers that simply refused to open more than a few sheets of metal wide. Just perfect for my plan! I would use the pliers and the weight of the car to press it down for welding. It was a bit short but it worked spectacularly. Put the pliers in place at an angle, wedge my leg and thigh under the car and lift until I could get the pliers straight up. Weld two holes, lift again with thighs and reposition prop. It was just enough to press it tightly to the weld line, but not enough to damage the metal. Once prop-ed, I could wiggle the metal to make a good fit and weld away. It made for really long slow progress, but it was progress!
Welding Progress

Once I got to the front bit under the bonnet, I realized how hard it was to bend back the metal I had mangled so much ripping off the old metal. Process was beat back old metal from the inside, with body-working hammer and bar, until the inside metal was flush with the new metal. Weld one hole. Repeat, again and again and again. Learned my lesson. Yes metal can be repaired, it just takes alot of time and effort. Much better not to mess up the metal in the first place.
Ta Da!
 Overall, I an happy with the results, even if this side was a bit more problematic from the start. The lines all meet up well and prepwork needs to be done for painting now.
Taped and prepped for next moves

Line-weld points are taped over for later welding. Both sides replaced, though critical time was wasted waiting for someone to do it. Need to get the line welds done now...
Welding 301
Oh, where does the time go? Christmas plus New Years plus Work = Poor Neglected Spitfire. I'm still commenting on work done last year, about 1 month ago. If I don't start, when will it ever end. On with the show!
After the success of the driver side, I proceeded with the fender repair on the passenger side. Prepped the same as before, punching, stripping, then weld-through priming.

The welding went pretty smooth on this piece and all looks well. Really anticlimactic. Am I finally getting the hang of welding, is it really this easy? We'll see.

I still need to fill the holes and get the top line-welded...
After the success of the driver side, I proceeded with the fender repair on the passenger side. Prepped the same as before, punching, stripping, then weld-through priming.
Punched, Stripped and Primed

The welding went pretty smooth on this piece and all looks well. Really anticlimactic. Am I finally getting the hang of welding, is it really this easy? We'll see.
Patched!

I still need to fill the holes and get the top line-welded...
Thursday, December 23, 2010
Welding 202
Pushing on to get he body parts welded on, I continued with the driver side. It was a juggling act of making sure the bonnet fit right, the door fit right, and the bottom seam would sit right. So on with the show!

Using the same method as before, with punching, stripping off the paint, and painting with weld through primer. Welding on the end cap onto the rocker panel was a royal pain as the rocker panel had to be tensioned to line up correctly.

As I am kinda short on vice grips, test fitting such large parts is somewhat problematic. I can now appreciate the "cleco's" my dad uses at work, though they are primarily for riveting. The parts at least test fit OK.
 After the parts are positioned and the door is closed over the parts, the welding begins. I always start welding with a bit of trepidation. Not having much practice leaves me somewhat apprehensive of starting, but the work won't get done unless I begin. And if I mess it up, well, I have only myself and my inexperience to blame.
 The welding up to this point is going pretty slow and smooth with no major problems.
 Welding this area was somewhat more difficult as there was no place to put a clamp. I clamped the closest spots that I could get it on. From there it was pretty apparent that I wasn't going to make a good connection on any of them. The metal I was welding to was deformed when I removed the old metal. I settled on whacking it back into seemingly flat from behind and got a semi-flat surface. Once that was done, I started the dance of pressing onto the new metal to make it flush to the metal I was welding to and positioning the welder to weld it. I really could have used a clone, or at least an extra hand or two grafted on to get it done. Once welded, I hammered from the back to close any gap left over.
 I have an area that I have a problem with. I won't be doing any seam welding as I don't have the skill, and that area with the two holes, the metal underweight is far from being close. This area was welded with bronze and filled to meet the metal. I will leave this to more experienced people to finish up.
 This part was removed to be able to put on the new metal. It was a royal pain to re-weld on. 22 weld points never seemed so hard. I couldn't get the top to adhere when welding. I moved on and was able to finally get it, once the rest were welded. The small hole filling took me a bit to figure out but It got done. Once complete, it had to be hammered back to meet the metal around the welds.
 It was do or die time. Would the door fit? Of course it fit. Why do I ever doubt myself. Overall I am really happy with the fit and the meeting of the lines. I am not so happy at the front and where it meets the rear fender as it didn't meet up very well, but I thing with a little seam welding and a bit of bondo it will work out just fine.
 I taped over the areas that are to be seam welded as I will not be able to address that in this visitation of the car. Overall, it was a lot of work, a lot of learning, but the final product looks really pleasing. I has only one weld at the bottom that I burned through both the backer metal and new metal through the thin point, but luckily it made a good weld and worst case, I can add metal if I am careful with the welder. I will likely fill it with bondo and move on though.
Varying Stages of parts preparation

Using the same method as before, with punching, stripping off the paint, and painting with weld through primer. Welding on the end cap onto the rocker panel was a royal pain as the rocker panel had to be tensioned to line up correctly.
Test fitting the Parts

As I am kinda short on vice grips, test fitting such large parts is somewhat problematic. I can now appreciate the "cleco's" my dad uses at work, though they are primarily for riveting. The parts at least test fit OK.
Welding Start, under the Door
 After the parts are positioned and the door is closed over the parts, the welding begins. I always start welding with a bit of trepidation. Not having much practice leaves me somewhat apprehensive of starting, but the work won't get done unless I begin. And if I mess it up, well, I have only myself and my inexperience to blame.
Door removed, working on the inside
 The welding up to this point is going pretty slow and smooth with no major problems.
Under the Bonnet
 Welding this area was somewhat more difficult as there was no place to put a clamp. I clamped the closest spots that I could get it on. From there it was pretty apparent that I wasn't going to make a good connection on any of them. The metal I was welding to was deformed when I removed the old metal. I settled on whacking it back into seemingly flat from behind and got a semi-flat surface. Once that was done, I started the dance of pressing onto the new metal to make it flush to the metal I was welding to and positioning the welder to weld it. I really could have used a clone, or at least an extra hand or two grafted on to get it done. Once welded, I hammered from the back to close any gap left over.
Problem Area
 I have an area that I have a problem with. I won't be doing any seam welding as I don't have the skill, and that area with the two holes, the metal underweight is far from being close. This area was welded with bronze and filled to meet the metal. I will leave this to more experienced people to finish up.
Finishing Part
 This part was removed to be able to put on the new metal. It was a royal pain to re-weld on. 22 weld points never seemed so hard. I couldn't get the top to adhere when welding. I moved on and was able to finally get it, once the rest were welded. The small hole filling took me a bit to figure out but It got done. Once complete, it had to be hammered back to meet the metal around the welds.
Putting the Door back on!
 It was do or die time. Would the door fit? Of course it fit. Why do I ever doubt myself. Overall I am really happy with the fit and the meeting of the lines. I am not so happy at the front and where it meets the rear fender as it didn't meet up very well, but I thing with a little seam welding and a bit of bondo it will work out just fine.
Taped up to protect the seam weld points
 I taped over the areas that are to be seam welded as I will not be able to address that in this visitation of the car. Overall, it was a lot of work, a lot of learning, but the final product looks really pleasing. I has only one weld at the bottom that I burned through both the backer metal and new metal through the thin point, but luckily it made a good weld and worst case, I can add metal if I am careful with the welder. I will likely fill it with bondo and move on though.
Monday, December 20, 2010
Welding 201
With another week off, I planed to do the unthinkable, weld on the body pieces. I am by far not a welder, but the work has to get done. The first piece that has to be welded on is the fender repair piece. I chose to start with the driver side. Why the driver side? I could philosophize some wonderful explanations, but to be honest the welder could only be so far away from it's outlet and where the car was, I couldn't get to the other side.
 With a liberal coating of weld through primer on the location, I was prepared to place the piece and begin. I had test fit the piece here probably about a dozen times in preparation for this day.
 The replacement piece was prepped as follows. The holes to weld in were punched with this wonderful pneumatic punch, which made a perfect sized whole perfectly spaced to help prevent burning out the side. Once the wholes were punched, the entire areas that would be welded were wire-wheeled to remove the black paint and were brought to shiny metal. Once that was done, the areas were sprayed with weld-through primer. Weld through primer doesn't burn up in the heat and can be welded on. Great stuff, hopefully it will prevent the areas from rusting through at the welds.
 The piece was carefully positioned, with anchor bolts to make sure the top line would be welded nice and snug for the final line weld. Each weld was carefully done, making sure I got a good weld to the metal underneath. Once the welding was complete, the door was put back on to make sure it would fit nicely. Overall, I am quite pleased with the piece, though getting the bolts out of the holes and out of the car was a PITA.
Prepared Welding Area
 With a liberal coating of weld through primer on the location, I was prepared to place the piece and begin. I had test fit the piece here probably about a dozen times in preparation for this day.
Prepared Replacement
 The replacement piece was prepped as follows. The holes to weld in were punched with this wonderful pneumatic punch, which made a perfect sized whole perfectly spaced to help prevent burning out the side. Once the wholes were punched, the entire areas that would be welded were wire-wheeled to remove the black paint and were brought to shiny metal. Once that was done, the areas were sprayed with weld-through primer. Weld through primer doesn't burn up in the heat and can be welded on. Great stuff, hopefully it will prevent the areas from rusting through at the welds.
Positioned and Welded
 The piece was carefully positioned, with anchor bolts to make sure the top line would be welded nice and snug for the final line weld. Each weld was carefully done, making sure I got a good weld to the metal underneath. Once the welding was complete, the door was put back on to make sure it would fit nicely. Overall, I am quite pleased with the piece, though getting the bolts out of the holes and out of the car was a PITA.
Friday, December 3, 2010
Welding 102
One of my major concerns with the welding was getting the inner sill installed to shore up the body stability. I have the door-frame braced with 2X4s but I don't like leaving it like that, so after my "success" welding on the repair pieces, I jumped onto installing them.
 After consulting with the guy who was supposed to do the welding, I used his pneumatic hole punch to punch about 28 holes on the side of the replacement sill. It felt horrible punching that fresh piece of metal, much worse wire brushing off the paint for the weld-through primer. But sitting there contemplating it will not get me any closer to completion.
 It's amazing how much better you can get in one day. Each weld was made with a clamp next to it where I could rest the welding head on to make the weld. With this bracing, I was able to be more concerned with the timing of the weld, rather that it slipping in the act of flipping down the mask, or instinctively pulling away from the weld when welding. It was slow work but it went really well. On this piece, I had 4 welds that didn't grip the under-metal, those will be drilled out and re-welded.
 Though the welding proved just as easy as the other side, I had a bit more problems on this one. About 7 welds did not take, and I had 2 burn through welds. One of them I was able to flow over and make a good weld, the other didn't grab. I lifted the car up on the lift and welded through the melted hole and was able to repair from the back. Being that I was under the car any way, I welded the 7 welds that didn't grip through the drill holes in the other side. I still had one weld that was just being stubborn and I would have to drill it out and re-weld.
 All the welds were sanded down to flat and whacked with a hammer to verify a good weld. Once all were sanded flat, I primed over all the good welds. As you can see the four that needed to be drilled are plainly obvious. I drilled them, re-welded all four and got 3 to grip. Re-drill, re-weld and I got the fourth.
 Though it is not very obvious, the bad weld is right next to the vice grips. Though I like to keep my tools in the best of shape, I have abused this set of vice grips badly, with weld marks all over the head. Sometimes life is like that. Drilled and re-welded took care of this problem spot nicely.
 With the sill in place, it was quite amazing the stability it added to the body. I replaced the door and it still closes nicely. I need the door in place to put on the remaining metal and make sure I have a nice fit before welding. I also pressed the entire seams together to take care of any gaps and try and make a nice line both above and under the sill.
 I replaced this door as well after this picture was taken. Everything looking good, pressing the seams, etc. The next step is to put in the back fender repairs, then the rocker panel itself. This work will be done another day, likely next week. All in all I am definitely happy with the results and my apparent improvement on the welding. I haven't burned myself since the first day.
Passenger side with holes
 After consulting with the guy who was supposed to do the welding, I used his pneumatic hole punch to punch about 28 holes on the side of the replacement sill. It felt horrible punching that fresh piece of metal, much worse wire brushing off the paint for the weld-through primer. But sitting there contemplating it will not get me any closer to completion.
Passenger side welding
 It's amazing how much better you can get in one day. Each weld was made with a clamp next to it where I could rest the welding head on to make the weld. With this bracing, I was able to be more concerned with the timing of the weld, rather that it slipping in the act of flipping down the mask, or instinctively pulling away from the weld when welding. It was slow work but it went really well. On this piece, I had 4 welds that didn't grip the under-metal, those will be drilled out and re-welded.
 Driver side welding
 Though the welding proved just as easy as the other side, I had a bit more problems on this one. About 7 welds did not take, and I had 2 burn through welds. One of them I was able to flow over and make a good weld, the other didn't grab. I lifted the car up on the lift and welded through the melted hole and was able to repair from the back. Being that I was under the car any way, I welded the 7 welds that didn't grip through the drill holes in the other side. I still had one weld that was just being stubborn and I would have to drill it out and re-weld.
Passenger side primed
 All the welds were sanded down to flat and whacked with a hammer to verify a good weld. Once all were sanded flat, I primed over all the good welds. As you can see the four that needed to be drilled are plainly obvious. I drilled them, re-welded all four and got 3 to grip. Re-drill, re-weld and I got the fourth.
Driver Side primed
 Though it is not very obvious, the bad weld is right next to the vice grips. Though I like to keep my tools in the best of shape, I have abused this set of vice grips badly, with weld marks all over the head. Sometimes life is like that. Drilled and re-welded took care of this problem spot nicely.
Passenger Side sill complete
 With the sill in place, it was quite amazing the stability it added to the body. I replaced the door and it still closes nicely. I need the door in place to put on the remaining metal and make sure I have a nice fit before welding. I also pressed the entire seams together to take care of any gaps and try and make a nice line both above and under the sill.
Driver Side sill complete
 I replaced this door as well after this picture was taken. Everything looking good, pressing the seams, etc. The next step is to put in the back fender repairs, then the rocker panel itself. This work will be done another day, likely next week. All in all I am definitely happy with the results and my apparent improvement on the welding. I haven't burned myself since the first day.
Thursday, December 2, 2010
Welding 101
Well, one has to start somewhere. With all avenues of procrastination explored, I was finally faced with the fact that I needed to begin welding. I got one of the guys to set up the welder and show me how to operate it. Results can be seen below. These are my first attempt at spot welding. Apparently I am not very good at it as my dad labeled these "bubble gum" welds. Overall, I'm more concerned with stable attachment as the entire area will be covered.
 Wow, what can I say... I have a much greater respect for welders now. I seem to be much better at welding a line then a spot weld. I broke many rules on this weld that I feel I must talk about. Rule 1. Welding generates melted metal. Melted metal is HOT. Splatter will get everywhere if you don't clean the tip of the welder. It will get on you and cause burns that take about 2-3 weeks to heal up (Yes, I got burns). Rule 2. Clean your area before welding. If there is paper products near your work, they can be ignited (Yes, I set some masking paper on fire. Yes I set my shirt on fire, but only a small bit). One rule I was very careful with was the eye protection. I did wear the mask for EVERY weld! I have no desire to burn my eyes...
 Due to the extent of the missing metal, I felt it necessary to weld the back of this as well. Overall, this went much better than my first bit o welds. The most important thing is the piece is firmly in place, whacking it with a hammer didn't break any welds.
 Emboldened by my "success" on the passenger side, I quickly moved to the driver side. The welding went much more smoothly here. I did have some areas of burn though to the weak metal underneath but I was able to flow over it to get a good bond. Again, whacking it with a hammer didn't break any of the welds.
 Being that it will never be seen and it really is to shore up the strength of the rotten area of the sill I decided to only spot weld this piece on. Also, the metal is so thin in some of the areas, it would quickly burn through. It's somewhat obvious that I still am not quite getting the hang of spot welding. Not every weld here gripped the metal underneath, but there is enough of them to stiffen the area.
 This piece was placed mainly just to keep water from flowing into the rocker panel from under the car. Most of the rot was backed by the pan the PO installed. I plan to seal the bottom once complete with undercoat so I was primarily interested in there being metal there. On the right side, the metal was too flimsy to even think of welding it, but I was primarily concerned with the front.
All in all, I was happy that it was done, a functional but not pretty or elegant job. I will get better at it, likely by the time I finish the welding work.
Passenger Side Repair
 Wow, what can I say... I have a much greater respect for welders now. I seem to be much better at welding a line then a spot weld. I broke many rules on this weld that I feel I must talk about. Rule 1. Welding generates melted metal. Melted metal is HOT. Splatter will get everywhere if you don't clean the tip of the welder. It will get on you and cause burns that take about 2-3 weeks to heal up (Yes, I got burns). Rule 2. Clean your area before welding. If there is paper products near your work, they can be ignited (Yes, I set some masking paper on fire. Yes I set my shirt on fire, but only a small bit). One rule I was very careful with was the eye protection. I did wear the mask for EVERY weld! I have no desire to burn my eyes...
Passenger Side Back
 Due to the extent of the missing metal, I felt it necessary to weld the back of this as well. Overall, this went much better than my first bit o welds. The most important thing is the piece is firmly in place, whacking it with a hammer didn't break any welds.
Driver Side Repair
 Emboldened by my "success" on the passenger side, I quickly moved to the driver side. The welding went much more smoothly here. I did have some areas of burn though to the weak metal underneath but I was able to flow over it to get a good bond. Again, whacking it with a hammer didn't break any of the welds.
Driver Side Sill Repair
 Being that it will never be seen and it really is to shore up the strength of the rotten area of the sill I decided to only spot weld this piece on. Also, the metal is so thin in some of the areas, it would quickly burn through. It's somewhat obvious that I still am not quite getting the hang of spot welding. Not every weld here gripped the metal underneath, but there is enough of them to stiffen the area.
Driver Side front repair
 This piece was placed mainly just to keep water from flowing into the rocker panel from under the car. Most of the rot was backed by the pan the PO installed. I plan to seal the bottom once complete with undercoat so I was primarily interested in there being metal there. On the right side, the metal was too flimsy to even think of welding it, but I was primarily concerned with the front.
All in all, I was happy that it was done, a functional but not pretty or elegant job. I will get better at it, likely by the time I finish the welding work.
Subscribe to:
Posts (Atom)