Friday, September 17, 2010

Proposed Paint Color

In looking for a color to paint the car, I have my heart set on red. I've never owned a red car before. I love the look of a red car, and combined with the Spitfire style, red is a sure attention getter. I find that the existing color on the car seems too light and too orange for my tastes and I have kept my eye out for likely reds to use. As the car will never be confused as being all original, I don't mind deviating from the Signal Red of that year.

Color Samples
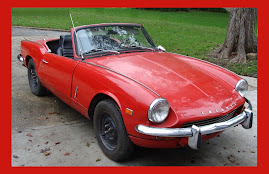
On the left of the color sample is the color that is on the car now, taken from a picture. The color on the right is the proposed color I am thinking about. It was also taken from a picture of a trunk painted that color. It looks a little too dark, but look how it shines on the trunk below.

The Truck

The shop where my car is at was repainting this trunk to match the replacement bed that the owner put on the trunk. The trunk owner preferred the red of the replacement bed much more then the funky blue two tone of the trunk itself. Fresh out of painting came this absolutely gorgeous trunk. This is the color I was looking for. I fished around and found the can used to paint it. With the can, I have the paint specifications and can get the color reproduced when the time comes.

Scarlet Red

Spray Can MADNESS continues...

Emboldened by the success of the floorboards and the trunk, armed with my mighty aerosol paint cans I marched on! It seemed like everything I sprayed turned out spectacular, I couldn't go wrong... or could I.
Driver Side Rear

Passenger Side Rear
The rear compartment was sprayed, carefully avoiding the vinyl wheel well covers that are in pretty good shape and I want to avoid having to change them. The pictures really don't do it justice as the flash went off when the pictures were taken.

Center Area
After carefully removing the hand brake, I proceeded to spray the center area and was giddy happy with the results. It really looked spectacular. Nice even paint, it looked like it came from the factory like that.

Under Front Wheel Wells
I switched to the glossy black and masked off the area under the wheel wells, and again, it looked spectacular. I then looked for other easy access areas that I could respray. I decided that with all the work I did on the wiper motor, I wanted to respray this area. I brushed it all well, like I had in other areas and...

Wiper Motor Shelf
Well, that didn't go so well now did it. I don't really know what happened here other than the entire area, though smooth, painted horribly. I will likely have to strip this layer off and try again once I figure out what went wrong the first time. Thus ends the madness, with a major downer on this horrible spot.

Brake Handle

I had sprayed this before the major downer and left it to dry. It wasn't the best paint job I had seen but it would be functional and acceptable. 4 hours later, I attempted to re-install it and things went downhill from there. First I shouldn't have painted where the hinge section is, as the paint just smeared away. Uhh smeared, that's not right, this stuff should have been dried by now. I tried to get it installed and kept hitting wetter and wetter areas of paint. Eventually the paint was ruined and I returned the piece to the house for stripping. 8 hours after being sprayed, it still had not dried. I stripped the entirety of the brake handle back to it's original condition and will retry once I get my spray paint confidence back.

Drivers Seat Base

With the fight I had to originally take off the seats, the thrill of triumph was quickly extinguished by the condition of the base of the seats. Seen here in all of it's ugliness, the base was partially protected with a waxol type of coating, while some of it was just plain rust.

Original Condition

As a sideline project, I would attack the base with a combination of hand brushing and wire wheels on afternoons when I had a bit of free time. I eventually got quite happy with the result. Time marches on and I moved to other fractional projects in my free time. The unprotected metal quickly began to powder rust again, though my free time had disappeared. I eventually made the time, brushed the rust off and sprayed it to afford it some level of protection.

First Spray
The first layer is this wonderful silver paint. I love the look it creates as it really looks like it isn't painted at all, just bare shiny metal. Unfortunately, it isn't really designed for outdoor, much less rugged handling.

Second Spray
To help protect the metal and the delicate silver paint, I spray a layer of clear coat on the piece. It really dulls the silver and takes away all shine to it. It ends up looking like a gray paint. Not really the effect I would like but it is protected at this point.

Installed
It really looks great on the assembled seat. All that remain is to acquire some Stainless Steel bolts, nuts, and washers to mount the seats to the car, I intend to repeat the sins of the past and use bolts that will drop through the welded on nut on the floorboard and put a matching nut underneath. I also will be using over-sized washers to attempt to spread the weight out over a larger area of the floorboard to hope to minimize the areas that are cracked.

Finalized Seat
Well, as you can see, you can't really even see this part. It likely will never be seen much, but I know it's there and I know it will last a bit longer with the tender loving TLC it received.

Wednesday, September 8, 2010

Amazing New Products

Coming soon to a vendor near you! Announcing the greatest new products for your aging British car since Waxol!

British Rust Seeds

Tired of always having the cleanest car at the show? Never get enough time in with your car? Running out of projects to work on? Well worry no more! Now available Premium British Rust Seeds!

Simply spread some of the rust seeds in the usual areas of your car and see the appreciation begin. No longer will your ride look like a pampered trailer queen, but a hard and fast driven piece of fun! Surely there are judges out there sympathetic to some rust.

Need more time with your car? Spreading liberal bits of rust seeds in you car and a well placed story of "If I don't remove the rust" will bring your significant other to let you have your quality time. It cleans up quickly, leaving more time for bonding with your special something.

With the rust seeds in place long enough and the rust will begin to grow, bring more excuses to buy more parts and rebuild time! I always wanted to drop a larger engine in it, but I need to remove that body rust, and I need to remove the engine to get to it anyway!

Rust Seeds are the way to go!

Testimonials abound.

Ms. Peal "I've used rust seeds to simulate damage and I was able to convince my husband I needed more parts"

Paul "Rust seeds, I got several rust farms in the back known as project cars"

Premium, all the way! Only the best

Guaranteed to be 100% British Rust, no domestic rust is allowed in our product. Naturally produced and, on request, we can provide guaranteed antique rust!

Contents may include, dirt, paint flakes, bugs, spiders, nuts, bolts and pretty much anything else up to 99.9% of the product. It adds to the abidance and believability.

Available in Starter size or for those who can't wait for the rust to grow...

Super-sized!
Instant Gas
Back in supply for a limited time only, Instant Gas! Simply add some instant gas in your tank and filler-up. A word of warning though, Instant Gas is not nearly as good as real gas. Please use sparingly. Also useful in accurately simulating fuel system problems.

Coming Soon!

Oil Leak Simulator - Engine not living up to the reputation of a British car and marking it's territory? Want to do engine work but can't convince the significant other to let you break the seal? Simply dribble the simulator around a seal and on the ground. We are in the process of sourcing actual used oil from British cars. Unfortunately sourcing this in used for is proving difficult as most oil has already leaked out.

Transmission Leak Simulator - In the same line of products as the Oil Leak Simulator, we present similar for the transmission. We seek out British cars corpses and crack open the transmission fluid. Available in two different varieties, Floor Fluid and Open transmission featuring authentic brass shavings.

The makers of these fine products is not responsible for any of the products shown. All content are approximate. These products are not warranted in any way to perform as advertised or even exist.

Tuesday, September 7, 2010

The Drivers Seat

Well, my personal goal of having the spitfire ready for the road by my birthday has come... and passed unfulfilled. Well, it was an ambitious goal to begin with. Though I do see the project time-line slipping with all the Summertime heat, I just can't get myself to working on it. I have to kick the funk off and get working...
Drivers Seat
One of the first items I will need to put back into the car to get things moving will be the drivers seat and boy does it need the work. Looking at the above picture, the seat looks really to be in pretty good shape. The foam seem quite acceptable, not dry-rotted and still providing plenty of support. The vinyl is relatively OK, a few scrapes, and a mild deformation of a burn, but considering the relative obscurity of the seats for a '69 I'm pretty happy with the way they look. The original interior of the car was tan so I'm not sure if they are recovered (likely) or replacement seats to match the now black interior. Now for the parts you can't see very easily.

Carefully looking at the above picture shows a little too much of a slant to the left. This is because the hinge pin is sheared. Looking at the pin itself, it's rusty but not a rust issue. I have no clue the amount of force necessary to shear this but I'm assuming it was a lot.
Sheared Pin
I spent a good 2 hours on that @$&!#ing pin. It resisted being punched out, it resisted a hacksaw to try and cut the heads off, it generally really was meant to stay in there and it sure tried it's best. I eventually got a rotary tool and a cutoff wheel and simply ground it out. The pin itself was re-drilled to accept a bolt and it was carefully repaired. The nut used only would go so far and left the bolt the ability to move, yet the nut was tight. It's not perfect, it's not original, but darn it it's functional and will be hidden from sight.

The next "issue" leads me to believe that the seats were recovered at some point in their life. Some PO (Prior Owner) had placed a sheet of metal under the seat. This work was definately not performed by British automakers. It literally looks like someone took a blowtorch and burned through to cut the metal to shape. Nothing was done to protect the metal from rusting and, oh, did it rust.

Seat Plate

I removed the offending plate and gave it to my father to use as a pattern. We had somewhat of a misunderstanding as he thought I wanted the plate refinished and was questioning my sanity! Thinking about it I never really said I wanted a Stainless plate made and just assumed that the shear offensiveness of the plate would be self-explanatory. Anyway, my dad produced this piece of loveliness in Stainless. I'm sorta disappointed that the piece will never be seen, but happy that the piece will never again become a rusting pile of ,err public forum, uhhh rust!

Replacement Seat Plate

Back Panel

The back panel was made from thin fiberboard. It needed replacement as it was warped out of shape, had mild water damage and was obviously not original as the screw holes weren't very well placed. I cut a replacement piece out of fiberboard from Home Depot. It's a little thicker that it was before but it should hold up better. I covered it with vinyl my wife bought me and, for my first upholstery job, I think it will do.

On beginning the work on the passenger seat I quickly noticed that I had no foam in the one from the drivers seat but the passengers seat had a thin foam under it. I plan to remake this side too, so I will make a matching no foam one and call it OK.

Drivers Seat

After repairing, cleaning the seat and conditioning the vinyl it looks pretty serviceable! I hope to soon be able to place the seat into the car, but the road to that point is long and hard.

Restoration work for a hobby should not be to a timetable, though to some point you have to set goals, lest it fade to a pile of parts that never get completed. I've seen so many advertisements for "everything is apart" project cars being sold off before completion. I simply refuse to give up!

Monday, August 23, 2010

Wheel Well Respray

The respray madness continues. Empowered by the fumes, and a separate can of gloss black, I attacked the wheel wells with a vengeance. I couldn't be happier with the results! The spray went on nice and easy and didn't put up much of a fuss. I had considered spraying an undercoat in these areas, though others have said it's unholy. To remove undercoat is a pain. I guess what swayed me to paint was that they were in generally such good shape that I though undercoat would be too excessive.

Passenger Side Rear
Driver Side Rear

Passenger Side Front


Driver Side Front

I have also included pictures of the wheel wells with the tires on, as that will be how they are seen most of the time. I plan to respray under the bonnet but I was able to fend off the madness and stop for the day. This was pretty impressive as I still have paint in the can. I'm sure that it would have fizzled out just at starting the next section...

Passenger Side Front
Passenger Side Rear

Driver Side Front

Driver Side Rear

Spray Can MADNESS!

Once I began spraying it was a magical transformation. I couldn't control myself and I kept spraying more and more and more. I was really upset with the bad can, and it cost me critical time. I had to remove everything from the trunk and carefully clean out the inside. Once it was apparent that I wouldn't be spraying the trunk, I had lost too much time and had to pack the car back for the day. So everything had to be carefully placed back in the trunk.

In the next weeks visitation, I quickly went to work. I removed everything out again and cleaned it all up again. It's amazing how quickly the dust accumulates even when covered. I began spraying.

Driver Side

Passenger Side
I am quite please with the results. Though far from perfect, pretty much everything will be covered so there isn't too much to worry about. In the confined area of the trunk, the fumes hung very heavy and I has to step away several time as, though quite nice feeling at the time, the fumes will leave you with a killer head-ache if you take in too much of them.


Emboldened by the results, or fogged by the paint fumes, I proceeded to spray the back of the compartment. I wanted to meet up with the floorboards but the can quickly decided it had produced enough. Looks like it's time to get a few more cans. It would have been smart to buy more than a can at a time, but then again I didn't. Draw from that any conclusions you wish.