Friday, January 22, 2010

Naked Spitfire

I have always found that the MK III Spitfires look naked without the bumpers attached. I removed the front and rear bumpers and they are in pretty good shape. There is a scratch in one of the rear bumpers, the front bumper is slightly bent, giving it a little but of attitude in it's smile.

Front View
With Bumper

Front View
Nekked

Rear View
With Bumper


Rear View
Nekked


After removal, the unprotected undersides show a lot of rust on unchromed supports, dirt, Wasp nest (no residents thankfully) and pine needles. The front bumper is missing two bolts that will have to be replaced.


During the photo-documentation, my puppy Snickers decided to do an apprasial of the condition himself. I guess it met with his approval as he quickly lost interest.


I will be cleaning these up at some later date and will document the results.

I also tried to remove the windscreen and again the seats, but was denyed It's best not to force these things and let them come as they do.

Tuesday, January 19, 2010

Before and After

In the process of removing all the important bits, I'm sorting into two separate plastic tubs. Before and After. I will be archiving the condition of certain pieces in the before and after being cleaned and polished, with comments, hopefully to keep track of what needs to be done.

Before:
This is a rear reverse light. It was found as lagniappe (a little something extra) in the trunk. It looked just horrible, though the chrome was in pretty good shape. It had paint over-spray, either white or primer.

I intend to select the best two out of three to place on the car.

After:
After a gentile washing and a bit of soft scrub on the glass, I believe that this actually looks quite nice. The over-spray has been removed and is a really nice piece. The glass has a fracture under the chrome piece, but it is completely covered and doesn't look to be very fragile.

Before:

Rear Fender Reflectors were very grimy. The plastic is chipped scratched and generally not very shiny. The rubber seals looked really bad, with paint over-spray, goo and gunk all over them. I was concerned about these cleaning up at all.

After:

All parts received a gentle washing which did very little to help them. I tested a bit of Goo-Gone on the seals and it helped a lot. I remember that once disassembled these are a pain to get them bent back in shape so I avoided that. Overall pretty good but still need to decide what to do with the plastic.

Before:

The Gas Cap. It's such a focal point on the car! Externally, it's chrome finish is not too bad, needing a but of TLC, but underneath is a problem. It is definately in need of work. I was concerned about the rubber seal, the surface rust, the pitting in the pipe and the non-smooth nature of the closure.

After:


I disassembled the piece but left the pins in place. A wire brush quickly took care of the pitting in the pipe. I wire brushed the non-chrome pieces and it worked out pretty well. I coated all the brushed metal with WD-40 to help with rusting. The chrome underside was brushed with a toothbrush (old one, I don't want greasy teethies). The paint over-spray on the underside cleaned off very easily. The outside was chrome polished and the hidey holes hit with the tooth brush. Overall, I am happy with the results, but really think I need to do something with the seal to refreshen it and the cap that closes the pipe needs something. I was thinking of plating it, painting it, etc but will have to be cautious as it will be in contact with gas.

Monday, January 18, 2010

Wayback Machine Re-Spin

This isn't my first rodeo. My first project that I worked on was a 1967 Mustang Coupe, with an inline 6.

The tale as I remember is as follows. The facts are likely obscured in time and my bad memory, This may get corrected as the facts get sorted out.

My Father was faced with getting a car for my brother. He had been eyeing this mustang parked under a pine tree for many years, belonging to someone he worked with. PO had bought it for his daughter and kept it after she had moved on to other vehicles. The transmission was removed from the car, sitting on the back seat if my memory serves me correctly.


He made a deal with the PO to buy the car IF it would run after re-installing the transmission. It did and he bought it.


We stripped the car to bare metal, bondo-ed the crap out of it, not too many dents, but they were everywhere. The worst was the driverside fender, with the hump caved in and no way to pop it back out easily. The only pannel not needing repair was the passenger side fender.
Next comes a layer of primer, and following that paint. The painter was someone my dad worked with and sprayed the car as a favor for him. It's good to have friends.

Two of these pictures are from showing the car, restored, to it's PO. It's good to let them see that their efforts to keep it alive are not wasted. My brother drove the car until his car lust turned to a Pontiac Fiero.

The mustang was parked at my Grandmothers house, until the time came for me to have it as my first car. In retrospective, my parents funded the purchase of the car, and my brother paid them back. They funded my brothers Fiero (buying back the mustang in the process), and sat on the car after I expressed interest in it. My grandmother housed the car until I was ready to re-paint and restore again (easier the second go round). I don't think I ever thanked them for their efforts fully and really miss the oppertunity to thank my grandmother, as she has passed, for the simple gestures of facilitating my first car.

MY Mustang...

I learned to drive in it, and used it to drive myself to high school and work. I had some very good times in it and my worst nightmare.

One night after work, my friend wanted to go out for a drink, I wasn't in the drinking mood but I agreed to go. He was out of work with a cast on his right hand. He wasn't supposed to be driving, but you know... I followed in my car, being extra careful as it had just started drizzling. I had just replaced the front breaks and they were very responsive. He broke very late for a turn and turned awkwardley into the driveway as he almost missed it. I was a good ways behind but I locked up the breaks, looked to the right and couldn't ditch it as a van was in a driveway waiting to pull into traffic. I couldn't swing left, traffic was whizzing by in the left lane. R.E.M. was playing on the tapedeck, "It's the end of the world as we know it (and I feel fine)" Strangely appropriate. If I had let up on the breaks, I would have bumped bumper to bumper and a few scratched would be all to this tale but... I slid into the back end of my friend's pickup trunk, his bumper sliding just on top of my bumper, lowered by the breaking...

I learned alot that night. I learned alot about family, how much my brother cared for me, how strong my father was in the face of adversity, and how much family stood together in a crisis.

That was the end of my mustang. Realistically, it wasn't relyable enough for me for work and school and the repair work was beyond out means at the time. She was sold off as a parts car. The buyer specifically said it was to be parted out. OUCH!

Never fear, many many years later, I saw a car parked in the University parking lot that looked sorta nice. On closer examination, it was my mustang, rebuilt and on the road. I never met the current owner, but all the special additions to the car remained intact as well as the paint color. I hope the car is providing someone else with pleasure to this day. It got me through an important part in my life and for that I will always have a bit of my heart into that car.

Introducing the Demon Rust

The bane to every classic car, the Demon Rust. Slowly eating away at our treasured past. Sure accidents can bend and buckle our cars, but nothing evokes quite the emotion of seeing a car rusting away to nothingness.

Aside from the floorboards, the major rust areas are as follows:

Driver side rocker panel
With one completely rusted through hole, the entire rocker panel needs to be replaced. What I am figuring is that eather the PO restoration ignored the bad areas on this car, or they developed after restoration. This car has been sitting somewhere for a long time, allowing Rust to build up in unprotected places.

Lower front of Driver Side rear quarter panel
Not too bad yet (need to get under the paint) but can easily be hidden. Hopefully, it will need only minor addition of new metal and the seam to the wheel-well is healthy.

Weld line on Driver Side rear quarter pannel
Obvious rust, though the weld line appears structurally sound. Hopefully just needs TLC and cleanup as I am unsure if putting new metal is a viable option here.

Battery box
I believe that pretty much every spit I've seen (ok I'll admit, that's about 3 cars) have a problem here. The Rust doesn't seem to be active, so this might have been arrested development from the PO restoration. I plan to either make a Stainless Steel pan to insert from above (complicated), or to mount from the interior and attach to the battery box from below (Simple).

Passenger side rocker panel
Though lacking holes, this side is the worst as far as obvious rust goes. This is slated for new metal too.

Lower front of Passenger Side rear quarter panel
Bad. It will need addition of new metal and the seam to the wheel-well is unhealthy. The integrity at the wheel-well is pretty much shot. Don't really know what I will have to do here.

Well that's the worst of the rust, though this demon is ever present, awaiting to devour our treasured past.


While removing the front instrument panel, I caused another hole in the driver side rocker panel as shown below. I know I will have to replace but I am concerned about body warping when this repair is done, the doors are a pretty good fit now. Hopefully I can keep it that way.

Friday, January 15, 2010

Fire up the Wayback Machine!

Remember when I mentioned my introduction to the Spitfires, my brothers '67 MKIII. Well, I've dug thought my old photos and found some images of that car and it's saga as I remember it.

My Brother found this beauty in the rough sometime around the 90's for $500.00 from a guy in the military. A long grueling tale of repair shop gone bad. He was deployed and left the car with the shop and kept getting billed for the repairs. They performed the bodywork but one of the workers secretly sold off all the chrome items and other choice bits, pulled off the car for the bodywork, painting, and engine work.

The guy found out about it after he had a week of leave and he found his car significantly less put back together than he had been billed and paid for. Lawyers got involved and he sold the car off in disgust. (of course this is his side of the story)


This is the condition it was in on delivery. Body looked great! A lot of important bits missing.

Once parts were located (another long story for another post) certain parts were slightly off. Signs of extensive repair work. Also a lot of the holes for the badges and lettering were simply filled over.

Lets all pay our respects to the parts car that gave its important bits so another could live. This car, another wrecked car and a GT6 gave most of the missing bits to bring the car back to life...

I will describe the stories of the wrecked car and the GT6 in a later post. Both are very interesting and entertaining stories. I lack pictures of both unfortunately. The wrecked car was rear-ended if my memory serves me correct and the GT6 suffered from extensive rot.


Here is the car in the final state I remember it, pretty and functional. Still missing many things, I lost contact with this car, and it was eventually sold when he moved away for work after college graduation.

Tuesday, January 12, 2010

A Tale of Four Wheels

Starting off with initial assessment. A car has four wheels, five if you count the spare. We rolled the car off the delivery trailer and was able to use the brakes to ease it down the ramp. The car was pushed to it's temporary home and the parking brake put on. The brakes felt fine to my untrained foot and the parking brake definitely held the car firmly in place.

The PO (Previous or Prior Owner) in this case at least twice removed, was supposed to have re-built the brake system. To what extent will need further investigation. But from first indications, the car has a functional brake system with no obvious leaks, and the master cylinder looks to be holding up.

Where the rubber meets the road!

Driver Side Rear-
From the little research I've done, I believe this to be a age appropriate rim, and probably the original color of the rims as from the factory. It is in decent condition, though like all the rims missing the hubcaps. One lug-nut is missing, though I found a replacement in the boot (trunk) and the grease cap is missing.

Why they made all the wheels creamy white I have no real clue other than possibly adding a white-wall look with the chrome hubcaps in place.


Driver Side Front -
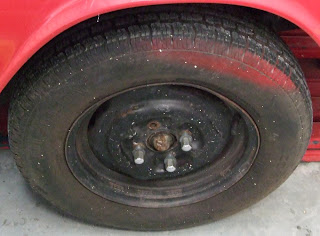
This looks to have been cleaned and re-painted a red color (master of the obvious). Very nice condition. The red doesn't match the red of the car and would look kinda odd with a hub-cap on. I am speculating that a PO tested this color and was unsatisfied.

All lug-nuts present and accounted for as well as the grease cap.

Passenger Side Front-
Painted black and not in very clean condition.

EKK! Missing stud and lug nut, grease cap in pretty bad shape. When I give this a lift, I need to examine all the studs for damage and replace this one. I've replaced studs on cars before and it's pretty trivial but once may ask why it is missing. I have another replacement lug from the boot, but that leaves the spare without a nut to hold it in place.

Overspray! This red matches the red on the paintjob. I need to look at the code date on the tired to try and date the PO restoration and paintjob age.

Passenger Side Rear-
Again black, I will likely refinish all the rims in either original white, or black. This leads me to believe that the first restoration of this car saw the rims painted black, and the original white was a spare tire. The red was eather from a donar car or a test to see what it would look like, performed after the restoration. I'd love to see examples of both with the hub cap in place.

All Nuts accounted for but again missing the grease cap.


Spare Tire -
Now missing the nut to hold it firmly in the boot, it appears to be in pretty good shape, though it is a different rim. From my research, it is from a later spitfire(71-80), likely a 1500 as they are more common. Also, from my research all the lug nuts appear to be from a later model car (71-80). I have what appears to be the original jack and tool to turn it. It's pretty rough and I will attempt to clean it up for use. The screw is in really good shape and is well greased, and does turn. Missing is "wheel nut wrench" though that can be ordered, or simply use an appropriate lug wrench.

Friday, January 8, 2010

Delivery Day

D-Day

My Brother called on New Years Day, having a little time (very strange for him) to potentially deliver the Spitfire to me. Arrangements were made, and the car was delivered to me on 1/2/2010. After approximately 40 years from it's birth over the pond, this rough beauty was delivered to me. We made arrangements with it's temporary home and secured the delivery.

Delivery Pictures!

Upon initial inspection it is a little worse that what I remember, the rust was rusting, but nothing out of the box.


Notice the toothy smirk of the slightly dinged bumper!

After securing the delivery, my brother and his wife couldn't stay, family obligations and such. My Wife and I were able to buy my brother and his wife coffee and beignets at Cafe Du Monde in the local Mall (parking a trunk with a flatbed trailer is very difficult in land strapped New Orleans Metro)


My wife and I ate lunch at a Chinese Place in town and got this as my fortune, strangely appropriate. Amazine how true to life such simple generic statements can be!My new car has yet to tell me her (I'm assuming it's a her) name, but I may be leaning towards Marylin. Very pretty, but has some problems under the skin. The name isn't etched in stone yet, the car hasn't agreed to it yet. Suggestions are open.

My friend who is housing the car until we can get it running and somewhat waterproof, recommended covering the car with something as to prevent shop dust and errant paint from messing it up, so here are the pictures of it with a makeshift Katrina Blue Roof tarp.


I am hoping this will suffice until I can get a proper car cover for it. I have no covered parking so I will need to get a car cover, somewhat waterproof, and a locking system for it.

I would like to wait to get it until after she has been repainted, to prevent messing up the new finish.

Wednesday, January 6, 2010

Engine Information

On further review of the Engine, it appears not to be the original engine. Code on the block reads FP28068UE.


Based on that information, http://www.triumphspitfire.com/enginenumbers.html defines my engine as a 1492cc, 1500 MG Midget (1975-79) for the US market. A Midget engine in a Spitfire?!? Well, not so fast! During that time-frame, MG was under the same parent company and they made MG use the Spitfire 1500 engine of the time!

Well, that makes me feel better, though now it opens up a host of new issues, or as Spitfire owners would call them adventures. What Parts do I use for the Engine, what car DID it come out of? What parts are affected by this different engine? Drat!

Well, thankfully, I am not attempting or have ever wanted to attempt to stay "Pure". I want to stay stock looking but if the engine doesn't match the car, I simply don't care, just as long as I can get it running and driving. I will have a roundtail with a squaretail engine and who knows what else...

First perplexing issue for me is I need a battery to start the engine testing for fire-up. Do I use a battery for a 1969 MKIII Spitfire, a 1975-79 MG 1500 Midget, or a 1975-79 1500 Spitfire? I'm looking to spend less than $100 for a battery.

I will be trying to narrow down the date of engine, finding to be included in a future post. Helpful suggestions always welcomed.